Creating and Using TomTom Geofences with React
Learn how to use the TomTom Maps SDK for Web and Geofencing API to create a geofence around a point.

We love maps. We love data. We love developers.
A geofence is a virtual perimeter (fence) defined around a specific geographic location. We can work with the fence to carry out various operations when an object with internet connectivity — like a mobile phone or car — enters or leaves such an area. For example, we can notify customers when a delivery driver is near their home, match a user with the nearest rideshare driver, or send customers to the closest store location.
In this tutorial, we’ll explore how to set up and work with a geofence in a React application, using the TomTom Maps SDK for Web and the Geofencing API, and how to set up geofences with irregular shapes using the Geofence Creator. Our app will create a circular geofence around where a user clicks on a map. You can find the complete code and see it in action on CodeSandbox.
PREREQUISITES
To follow this tutorial, you'll need the following: • Node.js installed on your computer to create a React app. Don’t have Node.js installed? Download the most recent version. • An API key to access TomTom services. If you haven’t yet, you can sign up for a free developer account to get one. • A free Postman account. • Practical knowledge of React, functional components, and Hooks.
SETTING UP
First, create a new React app and install the libraries that’ll be used in the demo. Create a new React app with this command:
npx create-react-app <app-name>
The command creates a new folder with the essential React packages on your computer.
Navigate into the project’s directory and install the TomTom Maps SDK for Web and the Turf.js library:
cd <app-name>
npm install @tomtom-international/web-sdk-maps @turf/turf
In this tutorial, we’ll be using the HTTP client library Axios to make HTTP requests. So, install the library with the command:
npm install axios
Now that React and the essential libraries have been installed, we're set to build our application.
DISPLAYING THE MAP
It’s time to build the app’s user interface (UI) to display a TomTom map. We won’t create any new files to create the UI, as the project bootstrapped by the create-react-app command already includes CSS and JavaScript files. We’ll use these to build out the app.
Open App.js and populate it with the code:
//App.js
import { useEffect, useState, useRef } from "react";
import axios from "axios";
import "./App.css";
// TomTom SDK
import * as tt from "@tomtom-international/web-sdk-maps";
// styles
import "@tomtom-international/web-sdk-maps/dist/maps.css";

function App() {
  const [map, setMap] = useState();
  const mapContainer = useRef();
  const AMSTERDAM = { lon: 4.896029, lat: 52.371807 };


  useEffect(() => {
    let map = tt.map({
      key: <Your_API_Key>,
      container: mapContainer.current.id,
      center: AMSTERDAM,
      zoom: 10,
      language: "en-GB",
    });
    map.addControl(new tt.FullscreenControl());
    map.addControl(new tt.NavigationControl());


    setMap(map);
    return () => {
      map.remove();
    };
    //eslint-disable-next-line
  }, []);


  return (
    <div className="container">
      <nav className="nav">
        <h1> Geofencing in React</h1>
      </nav>
      <div ref={mapContainer} className="map" id="map" />
    </div>
  );
}
export default App;
We start by importing the TomTom Maps SDK for Web, React hooks, and the Axios and Turf libraries at the top of the file.
Below the imports, the function App is defined. This is the component where our application will live.
In the function App, the useState and useRef hooks create variables that store the map and reference’s the HTML element the map is to be embedded in.
Next, the useEffect hook initiates the map on page load by calling the tt.map constructor with the necessary configurations. These configurations include the container parameter that takes the ID of the DOM element the map is to be embedded in, and the center parameter to center the map on Amsterdam, Netherlands, using its longitude and latitude coordinates.
Finally, the code returns the HTML for the browser to display.
Remember to replace the placeholder with your API key from your TomTom developer account.
Now, paste the CSS styles below into App.css to make the app look nicer than unstyled HTML:
/*App.css*/
* {
  padding: 0;
  margin: 0;
  box-sizing: border-box;
}
.container {
  width: 100vw;
  height: 100vh;
  display: flex;
  flex-direction: column;
  justify-content: space-around;
  align-items: center;
}
.nav {
  display: flex;
  justify-content: space-around;
  align-items: center;
  width: 100%;
  height: 10%;
  background-color: #4169e1;
  color: #ffffff;
}
.nav h1 {
  padding: 0.3125rem 0;
  margin-right: 1rem;
  font-size: 1.25rem;
  white-space: nowrap;
}
.map {
  width: 100%;
  height: 90%;
}
Now, the app can be run locally by navigating into its directory and running the command:
npm start
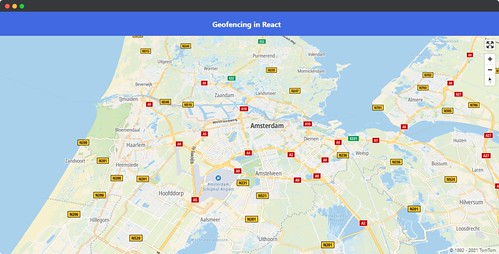
This command launches the application and opens it in a browser. The result should look like the image below:
ENABLING GEOFENCING
With the map displaying correctly, we can start creating geofences in our app using the TomTom Geofencing API. The Geofencing API enables us to create and manage geofences around specified geographical locations.
Before using the Geofencing API, you need to register an admin key. It provides an extra layer of security to authenticate your requests to the service.
Using Postman, send a POST request to https://api.tomtom.com/location/1/register?&key=Your_API_Key with a body of:
{
“secret”: "your_secret",
}
The body of the request contains a single property: secret. You’ll need this password to configure your account in the future, like registering a new admin key if the former is compromised. So, use a secret you can remember and ensure you don't lose it.
A successful response will generate and log your admin key to the console:
{
adminKey: your_admin_key
}
CREATING A PROJECT
Now that we have an admin key, we need to create a Project. This is a collection that stores and manages the geofences we create, each project identified with a unique ID. A geofence must be added to at least one project (it can be added to more) so you need to create a project before creating a geofence.
To create a project, send a POST request to the endpoint:
https://api.tomtom.com/geofencing/1/projects/project?adminKey<ADMIN_KEY>=&key=<API_KEY>
Set the project’s name as a parameter in the request body:
{
  "name": "Project_Name"
}
The API will respond with the project name and ID.
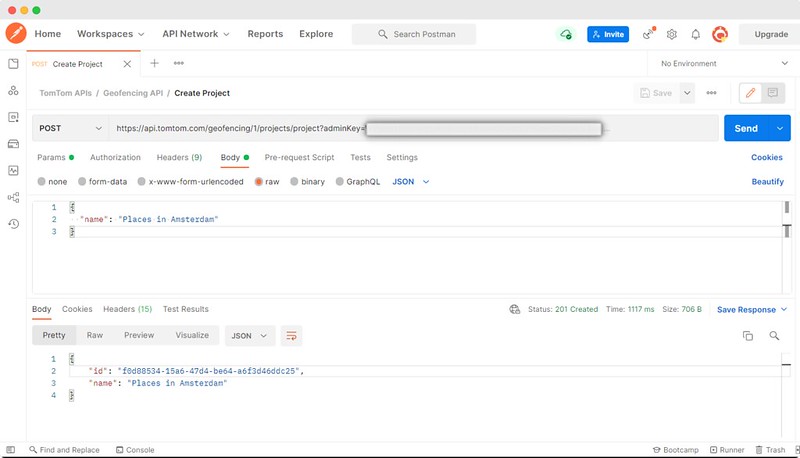
Visit Creating a Project to check out the request on Postman if you want to try it out.
With the project created, we can create geofences around areas of interest.
CREATING A GEOFENCE
Let’s explore two different ways we can create geofences: using the Geofencing API, and using the Geofence Creator.
GEOFENCING API
Until now, Postman has been used to handle all requests to the Geofencing API. Now, we’ll use JavaScript to add an onclick event handler to our TomTom map so that whenever a user clicks on the map, a circular geofence is created centered at the point where the user clicked. event handler to our TomTom map so that whenever a user clicks on the map, the handler creates a circular geofence centered at the point where the user clicked.
First, we define the function createGeofence to create the geofence:
  async function createGeofence(lng, lat) {
    const request = await axios({
      method: "post",
      url: `https://api.tomtom.com/geofencing/1/projects/<YOUR_Project_ID>/fence?adminKey=<YOUR_ADMIN_KEY>&key=<YOUR_API_KEY>`,
      headers: {
        "Content-Type": "application/json",
      },
      data: JSON.stringify({
        name: `Area ${Math.floor(Math.random() * 10000)}`,
        type: "Feature",
        geometry: {
          radius: 200,
          type: "Point",
          shapeType: "Circle",
          coordinates: [lng, lat],
        },
      }),
    });
    const response = await request.data;
    return response.id;
  }
The function above contains the details needed to create a fence around a location. The coordinates parameter takes the latitude and longitude of the site to be geofenced. Then, the parameter passes these coordinates to the function as the lng and lat arguments. shapeType defines the fence’s shape (a circle, in this case), and the radius parameter sets how wide the geofence should span in meters.
A post request is then made to the Geofencing API using Axios. The API creates the geofence and returns an ID.
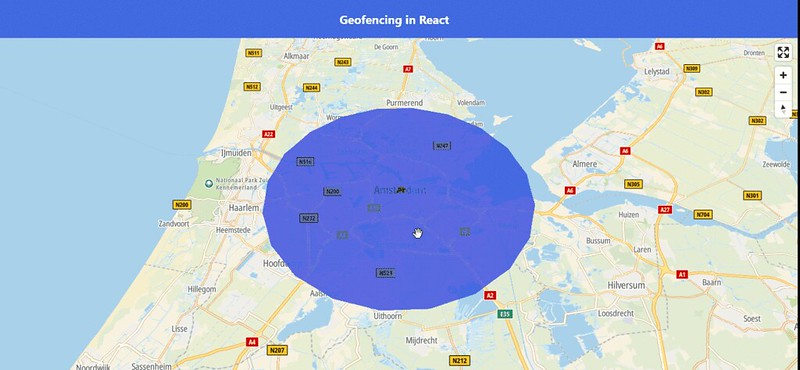
Next, we add an on-click handler within the useEffect hook that initializes the map on page load.
map.on("click", (e) => {
      const { lng, lat } = e.lngLat;

      // creating source data with turf.js
      const sourceID = `circleData ${Math.floor(Math.random() * 10000)}`;
      let center = turf.point([lng, lat]);
      let radius = 10;
      let options = {
        steps: 15,
        units: "kilometers", // or "mile"
      };
      let circle = turf.circle(center, radius, options);
      map.addSource(sourceID, {
        type: "geojson",
        data: circle,
      });


      //fetching and drawing the map
      Promise.all([createGeofence(lng, lat)]).then((result) => {
        axios({
          method: "get",
          url: `https://api.tomtom.com/geofencing/1/fences/${result[0]}?key=<YOUR_API_KEY>`,
          headers: {
            "Content-Type": "application/json",
          },
        })
          .then((response) => response.data)
          .then((result) => {
            map.addLayer({
              id: `circle ${Math.floor(Math.random() * 10000)}`,
              type: "fill",
              source: sourceID,
              paint: {
                "fill-color": "blue",
                "fill-opacity": 0.6,
              },
            });
          });
      });
The code above adds an on-click handler to the map. Then, we tap into the event object to get the lnglat property. On a TomTom map, the event object has the lnglat property — the geographical coordinates of the point where the user clicks.
Next, we use the turf.js library, which is the easiest way to display a circle on a TomTom map, to create a GeoJSON circle and add it to the map as a styling source.
Finally, the createGeofence function is called to create the geofence, passing in the lnglat property from the event object as its lat and lng arguments.
The function returns a promise and the geofence ID. We’ll tap into this promise, fetch the details of the newly-created geofence, then display it on the map.
Now, whenever the user clicks on the map, a circular geofence is created that’s centered on the point where the user clicked.
GEOFENCE CREATOR
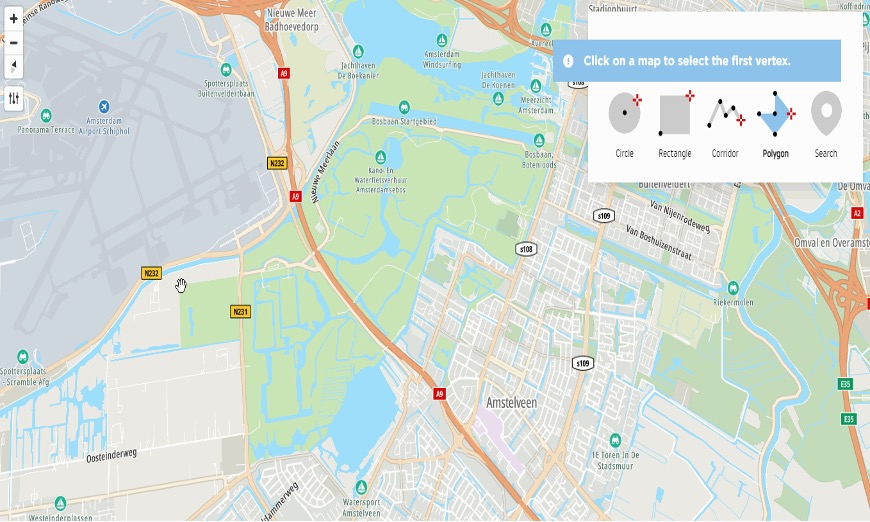
To enable developers to easily create complex-shaped geofence in their applications, TomTom introduced the Geofences Creator. It’s a graphical user interface to easily create and edit geofences using the Geofencing API.
Let’s see how seamless the process of setting up a geofence can be using the Geofence Creator. We’ll create a fence around Amsterdam’s most visited nature park — Amsterdam Bos which has a geometry of an irregular polygon.
To launch the Geofence Creator, visit the developer portal and provide your API key and admin key. Visit the Project to store the geofences you want to create. Setting up a fence with Geofence Creator can be done following the steps:
Move the map where you want to put the fence. In this case, Amstelveen, Netherlands.
Click on any of the icons at the top right corner. These represent the shape of the geofence you want to create. You can select a circle, rectangle, polygon, or even search for the location by clicking on the location icon and having the geofence drawn around its geometry. For this tutorial, click on the polygon icon.
A polygon is made up of vertexes. Click on the map to select the first vertex. Then, click on another point to mark the second vertex. Keep clicking to draw out the desired shape.
When you’re done, double-click to end the drawing.
A popup opens, where you can provide a name for the fence and, optionally, any additional properties. The newly created fence is now stored at the Geofencing API service.
We’ve created a geofence in the Geofence Creator, but how do we get it to display on our applications? We reference a geofence using its ID.
Below is the code snippet to display a geofence in your applications using its ID:
map.on("load", () => {
fetch(
"https://api.tomtom.com/geofencing/1/fences/<Fence_ID>?key=<Your_API_KEY>"
)
.then((response) => response.json())
.then((result) => {
console.log(result);
map.addLayer({
id: "Fence ",
type: "fill",
source: {
type: "geojson",
data: result,
},
paint: {
"fill-color": "purple",
"fill-opacity": 0.6,
},
});
});
});
In the Geofence Creator, right-click on the created geofence. This opens up a popup containing details about the fence like its name, ID, and any additional properties.
Copy the fence’s ID and replace the placeholder in the code snippet above with it. Now the fence should be displayed properly, like in the image below.
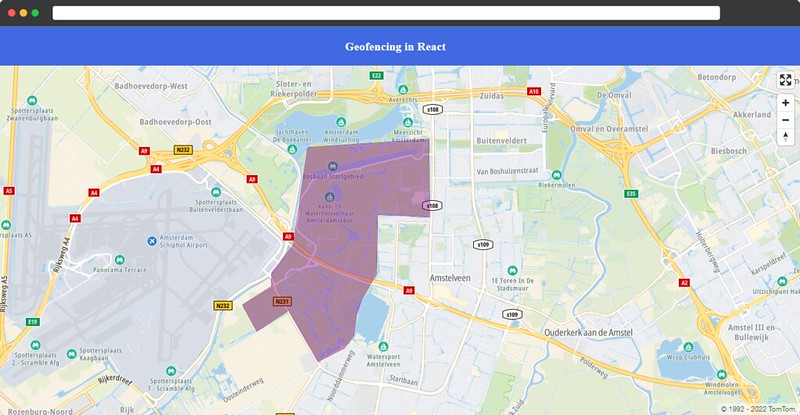
Wasn't that seamless? The Geofence Creator makes it simple to set up irregularly shaped geofences.
SENDING NOTIFICATIONS WHEN GEOFENCE TRANSITIONS OCCUR
TomTom’s Geofencing API provides an alert service to notify our app when objects with internet connectivity enter or leave a geofenced area. The service can send the notifications to a list of email addresses subscribed to the service or a collection of webhooks, such as a Slack or Microsoft Teams channel.
When the service is enabled, TomTom notifies the email address and webhook URLs whenever an object crosses the fence. Check out this article, Leverage Routing, Geofencing, and Notifications APIs to Send ETA Alerts, for a more in-depth geofencing guide.
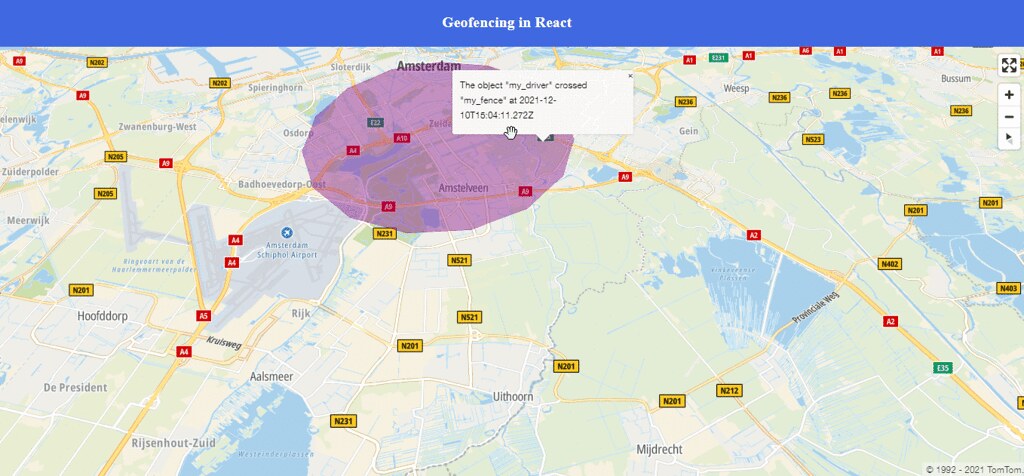
Building out the feature enabling notifications on geofence transitions is not within this article’s scope. However, we can add the type of response that TomTom sends about a geofence crossing as stale data to our application’s state to simulate what our application would do with this data after a geofence crossing.
The data received through email after a successful geofencing crossing comes in the following format:

Let’s break down the information in this message. "my_driver" is the object that triggers transition alerts upon entering or leaving the geofence (set by the object service in the Geofencing API). "my_fence" is the name of the geofence the object transitioned through, and 2021-02-10 at 00:52:49 is the time the transition occurred, expressed in the ISO 8601 date format.
We can add an object containing this information attached as properties, to our application’s state, like so:
const [geofenceData] = useState({
    object: "my_driver",
    fenceName: "my_fence",
    time: new Date().toISOString(),
  });
Next, we can define a function to simulate geofencing transition alerts in our app using the geofenceData object as a source of mock data.
function addMarker(lnglat) {
      const marker = new tt.Marker({ draggable: true })
        .setLngLat(lnglat)
        .addTo(map);

      function onDragEnd() {
        var lngLat = marker.getLngLat();
        new tt.Popup({ closeOnClick: false })
          .setLngLat(lngLat)
          .setHTML(
            `<div>
            <p> The object "${geofenceData.object}" crossed "${geofenceData.fenceName}" at ${geofenceData.time}</p>
          </div>`
          )
          .addTo(map);

marker.on("dragend", onDragEnd);

      }
The addMarker function creates a draggable marker centered on the point a user clicks. When the marker is dragged and dropped, a cancelable popup containing the mock data that we added to the application's state is created at the point where the marker was dropped.
Lastly, we add an on-click handler to the map to call addMarker whenever the map is clicked:
map.on("click", (e) => {
      addMarker(e.lngLat);
    });
With that, we have an application that can create real geofences around geographical locations of interest and mimics geofencing crossing alerts. Try it out on CodeSandbox.
NEXT STEPS
Creating and managing a geofence is just one of the features TomTom’s Geofencing API offer. TomTom’s wide range of services enables you to track a vehicle’s location relative to a fence, get notified when a car crosses a fence, determine how long an object has been within and outside a fence, and so much more.
All Postman requests made using the Geofencing API can be found in this Postman collection. Check out our blog post titled What is Geofencing? to learn more about geofencing.
Visit TomTom’s developer portal and sign up for a free developer account to start integrating our web SDK and the Geofencing API into your applications today.
Happy mapping!
This article was originally published at developer.tomtom.com/blog.


