Creating Multi-Language Maps with the TomTom Web SDK
Help your app users choose their preferred language when exploring TomTom maps internationally


Building applications on the web allows us to provide services to various people worldwide, regardless of language or culture. As such, our applications should reflect this diversity and cater to all our users.
This article explores how to use different languages in a TomTom map. By default, TomTom takes the official language of the user based on location. If the language is not specified,it uses neutral ground truth(NGT). However, travelers and recent immigrants, for example, may not speak the local language and prefer to select a custom language.
To use a specific language for our app regardless of the user’s location, all we have to do is specify the language using the language parameter. We can also change the language on the fly using the map.setLanguage method.
You just need to know some JavaScript to follow along with this tutorial.
SETTING UP
Let’s jump into the code. In this project, we use React for our implementation. Make sure you have Node.js installed on your computer. If you haven’t built a React app before, you can check to see if you have Node.js installed by typing the following in your terminal:
node -v
If it’s not installed, just go to the Node.js website to download the latest version.
Once we have the node installed, we can initiate our React app using create-react-app with this command:
npx create-react-app tomtom-language
Then, we navigate into our project folder from the command line:
cd tomtom-language
Now, we can launch the app:
npm run start
INSTALLING THE TOMTOM LIBRARY
We’re also installing TomTom Maps SDK. This software development kit enables us to view the map in the Document Object Model (DOM).
npm i @tomtom-international/web-sdk-maps
To use the services in your app, you must registeras a developer on TomTom, with thousands of free requests daily, even for commercial use. You’ll get an API Key when you register. Take note of your API key, as we’ll get back to it shortly.
Check thisout if you’d like to see the project in action (or see the complete project code).
GETTING STARTED
Now that we’ve set up our React app and downloaded all the packages let’s set up our TomTom map to display in the DOM. We first must open our App.js and ensure we’re importing all the packages, like this:
import "./styles.css";
import "@tomtom-international/web-sdk-maps/dist/maps.css";
import tt from "@tomtom-international/web-sdk-maps";
import { useState, useEffect, useRef } from "react";
For the first line, we import our styles from an external file called style.css. This file contains the CSS styles that this project requires. One specific thing to note is that we use .map to determine our map’s height.
.App {
  font-family: sans-serif;
  text-align: center;
}

button {
  margin: 2rem 0;
}
.map {
  height: 40rem;
}
We also import TomTom’s default map CSS styles. Then, we import the map package. Finally, we import the react hooks: useState, useEffect, and useRef. We use them to handle this project’s variables consistently. Plus, we can manipulate them easily to reuse components as we want.
Next, let’s go into our App function to declare our variables using react hooks.
const mapElement = useRef();
 const [mapZoom, setMapZoom] = useState(4);
 const [map, setMap] = useState({});
We use mapElement as the container for our map in the DOM using the useRef function.
The mapZoom variable allows us to set our map’s default zoom value on load. Here, the value is four. We can change the zoom value using the setMapZoom function. We use map to initiate and handle the TomTom map in our application.
Now, we employ useEffect to initiate our maps using the map library we imported earlier, called tt.map.
Next, we initiate the map inside useEffect, using the map SDK:
useEffect(() => {
    let map = tt.map({
      key: "<Your-API-key>",
      container: mapElement.current,
      center: [ 12.3, 32.992578 ],
      zoom: mapZoom,
      language: "fr-FR"
    });
    setMap(map);
    return () => map.remove();
  }, []);
We use the tt.map method to configure the TomTom map and assign it using the setMap function. The parameters it collects include the API key and the container, which we use to specify what holds the map in the DOM. In this case, we select the mapElement method that we defined earlier.
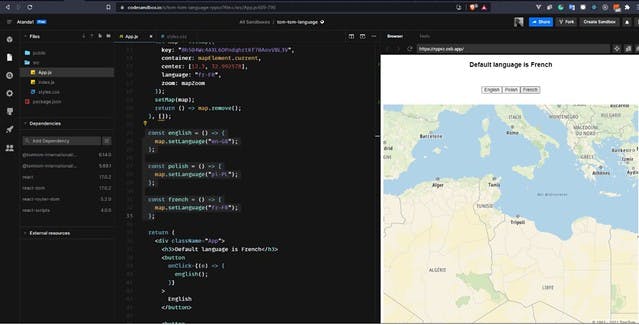
We use center to define the default coordinates that the map displays when loading the site. In this case, we are centering on the Mediterranean Sea, close to the Libyan coast, to display a map with different languages. We use zoom to determine the default zoom level of the map, using the already defined mapZoom. We use language to specify the language the map should use. Different languages use unique codes. For instance, the fr-FR code we use means French. If you’re unsure about a particular language and its code, you can always check TomTom’s Supported Languageslist.
When the page loads, the default language is French. We can still switch languages after adding the map to the site. Three buttons change the language to English, Polish, and French. Plus, we have a div that holds the map using the ref we defined, ref={mapElement}. ```return (
Default language is French
{ english(); }} > English { polish(); }} > Polish { french();These buttons trigger functions that essentially change the map’s language on the go, using a method called map.setLanguage. This method collects the language code and switches the map's language accordingly.
const english = () => { map.setLanguage("en-GB"); }; const polish = () => { map.setLanguage("pl-PL"); }; const french = () => { map.setLanguage("fr-FR"); }; ``` This technique enables the user to change their language manually after the map loads. The app now looks something like the demonstration below, with three buttons to choose a language.
To see this demonstration in action, check out the complete project.
NEXT STEPS
Congratulations, you’ve learned how to specify languages on your maps.
In this article, we first discussed the languages available in TomTom maps. Then, we covered how to create and initialize a new map with a custom language and add it to a web page. Next, we learned how to enable users to change the map’s language on the fly by creating a language switcher using HTML, JavaScript, and the map.setlanguage function. Finally, we explored an example of multi-language support in action.
Now that you know how to change map languages, you can offer more customized support to your international customers for a better user experience. Sign up and start using TomTom Maps to learn more about TomTom’s capabilities and experiment with the JavaScript SDK.
This article was originally published at developer.tomtom.com/blog.